Docker Basics
Kubernetes for Developers: Part II
Welcome to Part II of the “Kubernetes for Developer” series!
Kubernetes is often defined as a container orchestration platform or system. When I was first learning about Kubernetes, it wasn’t exactly clear to me what that meant. Kubernetes documentation now does a better job explaining it as “an open-source system automating deployment, scaling, and management of containerized applications”, but beyond knowing the definition, I was still unclear as to why we needed Kubernetes in the first place.
As a fullstack developer at the time, Docker and Docker Compose seemed to be enough. I could now write my code and reasonably expect it to work the same in the cloud. Afterall, it was a tangible solution to the “but it works on my machine” conundrum.
But as the applications started to scale and as I took on more DevOps/SRE types of work, I began to realize the limits of Docker and why Kubernetes was born. For most applications developers, this context of “why do we use/need Kubernetes” is often missing. So before jumping straight into Kubernetes concepts, I wanted to level set on basic Docker concepts that’ll not only be useful to explain relevant Kubernetes parallels but also lay the ground for the “why”.
Side note: Keen readers may point out that Docker != containers. Yes, technically Docker is actually a platform for developing and running containers. But due to Docker’s dominance in the container market, colloquially, Docker and containers are often used interchangeably. For the purposes of this article, the technical distinction is not that important so I’ll also be using those terms loosely.
This series is brought to you by DevZero.

DevZero’s platform provides cloud-hosted development environments. With DevZero, you can reuse your existing infrastructure configuration to configure production-like environments for development and testing.
Check out DevZero at devzero.io to get started today!
Containers 101
At its core, a container is a self-contained process that uses kernel namespaces and cgroups to isolate itself from other processes on the host machine (most commonly your laptop or VMs on the cloud). This has two high-level ramifications:
- Each container must contain everything that application needs from the code itself to its dependencies, configuration files, environment variables, etc. This means that containers should be portable.
- Containers are isolated from one another, meaning that multiple containers may run on the same machine.
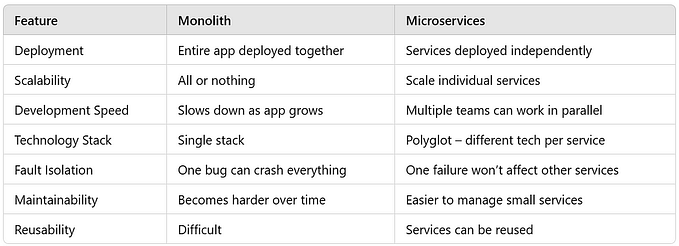
Compared to running applications on VMs directly, containers are more lightweight and resource-efficient for most microservices architecture since containers virtualize the OS.

Docker provides a platform to build and run these containers. For example, it provides CLI tools to package containers defined in a Dockerfile. It also provides a way to set environment variables to override configuration and attach storage for persistence.
I know I’ve glossed over a lot of details, but there are plenty of great tutorials available that goes in-depth so I’ll just link them here:
Docker Networking & Multi-Containers
One of the most important (and commonly misunderstood) aspects of Docker is networking. Just because a container is an isolated process does not mean it won’t communicate with other containers. In fact, for most modern applications, it most likely will talk to at least one other service whether that be a database or some other component. For example, a simple web application may have a frontend, backend, and database component with others like a cache or a message queue as it scales.
Docker conveniently provides multiple networks to allow communication between containers. Running docker network lsgives:
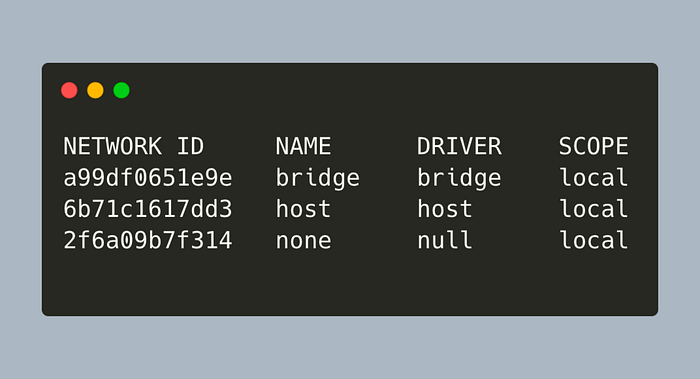
Bridge Network
By default, containers run on the `bridge` network. Each container is assigned an IP address. This means that containers can communicate with one another by specifying their IP address.
Let’s run two alpine images to test out the networking:
docker run -dit --name container1 alpine sh
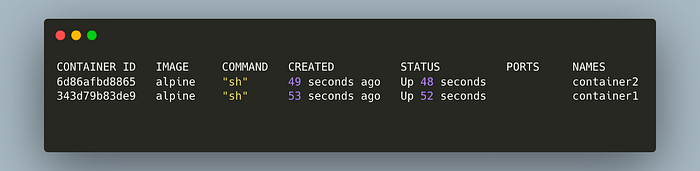
docker run -dit --name container2 alpine shThis brings up two alpine containers named container1 and container2 in the background with interactive TTY enabled. Run docker ps :
Let’s inspect the network to grab the ip addresses:docker inspect network bridge
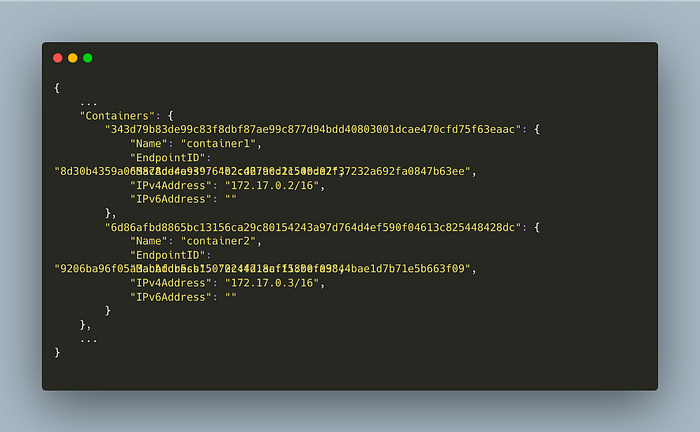
We can see that container1 is assigned 172.17.0.2 and container2 is running at 172.17.0.3.
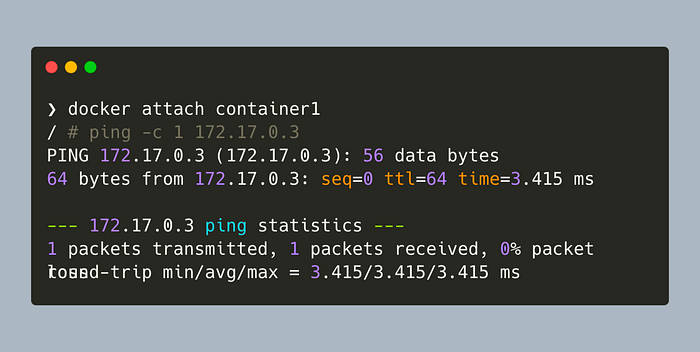
Now we can attach to container1 and ping container2:
Unfortunately, it doesn’t come with DNS resolution. Try pinging the container name, and it’ll fail:
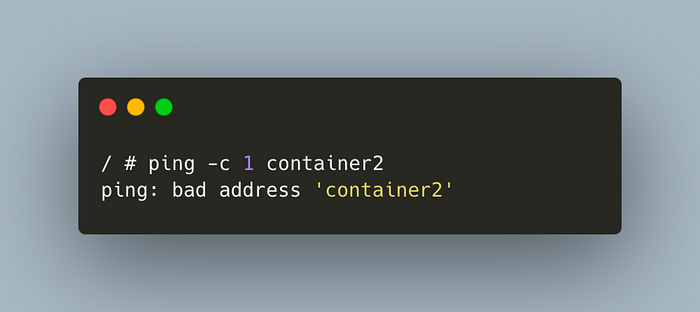
Now this behavior is not so useful. Containers are ephemeral in nature, so if a container restarts, it may be assigned a new IP address. You can periodically inspect the network, but it’s not so easy to work with.
User-defined networks, on the other hand, do come with automatic service discovery. To test this out, let’s create a network and run the ping test again:
docker network create test
docker run -dit --name container3 --network test alpine sh
docker run -dit --name container4 --network test alpine sh
Now we can attach to container3 and ping container4 by name:
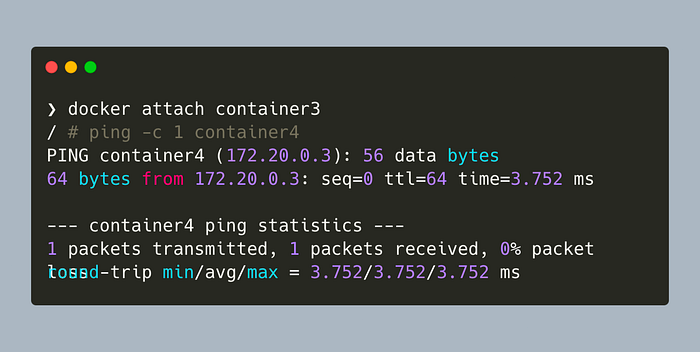
In practice, this is most often used in Docker Compose where multiple services are running in the same network. Going back to our web application example, your containers can now talk to each other by name instead of IP address.
Host Network
The other useful method is binding to the host network. This allows containers to retain process level isolation yet expose its ports to Docker’s host network.
Let’s run a nginx container to illustrate: docker run -d — network host nginx
Once you navigate to http://localhost:80/, you will see the usual “Welcome to nginx!” message:

If you were following along and you were using a Mac, you would have noticed that it probably did not work for you. This is because Docker daemon actually runs on a virtual machine on Macs. So a different method is used. We use the --publish, -p command on Macs to forward traffic to host network:
docker run -d -p 8080:80 nginx
Now you should be able to navigate to localhost:8080 to see the nginx page. On Docker Compose, this field is exposed under `ports`. Remember this topic of “port-forwarding” as this will be important to understand Kubernetes networking.
Scaling Up & Out
In practice, you as a developer most likely interact with Docker in the following ways:
- Creating a Docker image that gets published to some registry and run on the cloud
- Using containerized components to run integration tests locally. You might even be using testcontainers for unit tests.
- Using Docker Compose to run tests in CI
In all of these scenarios, Docker does its job well. You can package your code to run in production, and also write tests that involve multiple services.
But let’s now scale our solution up to tens, hundreds, or even thousands of containers. Now all of your containers cannot fit on the same host machine. How do you let your containers talk to one another when they are running on different machines? Or how will you handle Day 2 concerns like autoscaling, automated upgrades/rollbacks, configuration management, etc? And what about dealing with issues that arise from different Docker environments between your local machine vs. a cloud environment?
This is where a container orchestrator comes in.
So starting next week, we’ll dive into what Kubernetes is and how we can build on our Docker knowledge!
Check out other articles on the Kubernetes for Developers Series
- Part I: Why learn Kubernetes at all?
- Part II: Docker basics
- Part III: Kubernetes 101 — Pods & Controllers
- Part IV: Kubernetes 101 — Architecture & Networking
- Part V: Kubernetes 101 — Resource Management & Scheduling
- Part VI: Popular Kubernetes Tools
- Part VII: State of Kubernetes 2023
- Part VIII: Advanced Kubernetes Topics